Develop an iOS 14 Widget in Flutter with SwiftUI
Damn, I really want to create an iOS 14 homescreen widget, but my app runs on Flutter. So I guess it’s not possible? 🤕


Thanks god, you are wrong and you are in the right place. In this article, I will show you how to create an iOS Widget-Extension for your Flutter App.
On September 16, 2020 iOS14 was released and for the first time since the release of Apple’s mobile operating system there was a change in the home screen. It is now possible to show small apps (widgets) on the home screen, where users can see important information without having to open the corresponding app. A well-known example is the weather widget, which is definitely a great use case for Widgets.
To take it right from the front: Unfortunately, there is currently no possibility to code the widget in Flutter itself. The widgets have to be programmed in Xcode and SwiftUI as usual. But what is very well possible is to enable the communication with Flutter and that is exactly what this is all about. So let’s get started.
Prerequisites
- Basic knowledge in Flutter & SwiftUI
- Flutter Setup (https://flutter.dev/docs/get-started/install)
- Xcode Version ≥ 12
App Creation
We will create a small example App that shows the concept of a Widget-Extension with Flutter. To create the app execute the following command in your Terminal.
flutter create <app_name>Widget Creation
Next let’s create the widget. Open the Runner.xcworkspace in your ios folder and add a new Widget-Extension Target (File -> New Target) and give it a proper Name.

That was easy, right? So we run the app using Xcode and find out that our app now supports widgets 🥳 To add a widget you have to tap and hold the home screen until a ➕ appears in the upper left corner. When you click on the icon, a list of apps will appear. Our newly created app should be included.

Widget Code Structure
Let’s dive into Swift and have a look at the code structure of a Widget-Extension. If you open up your <WidgetName>.swift you will see 5 important structs.
func placeholder When WidgetKit displays your widget for the first time, it renders the widget’s view as a placeholder. A placeholder view displays a generic representation of your widget, giving the user a general idea of what the widget shows.
func getTimeline With this method you can create an array of timeline entries with the current datetime and if needed also entries in the future. So instead of running the extension all the time, you pass “timelines” which allow you to update the widget on different time triggers (for example every hour). In our case we will only create one entry and trigger the update manually with Flutter 😎
func getSnapshot This function should return a “timeline” entry with dummy data. It is used to render the previews in the widget gallery.
SimpleEntry defines the data for a timeline. This data is then used to render the widget.
FlutterWidgetEntryView is responsible for rendering the Widget with SwiftUI. entry is of type SimpleEntry as described earlier.
FlutterWidget allows you to set the kind and some other configurations like display name and description (shown in the Widget Gallery)
FlutterWidget_Previews responsible for the Widget Gallery / Preview Canvas
Communication Flutter ➡️ Widget
For the communication part we use UserDefaults. An Interface to the user’s defaults database, where you store key-value pairs persistently across launches of your app.
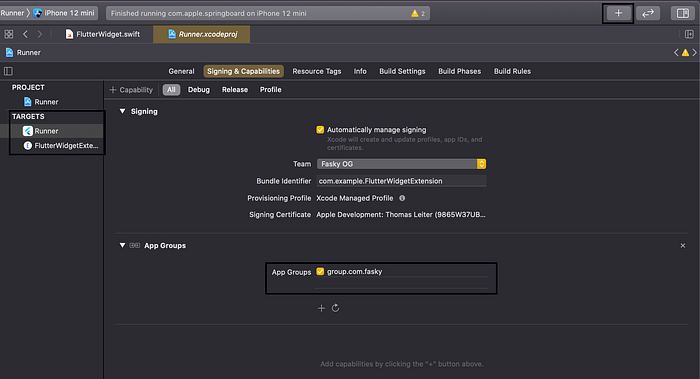
Add the capability “App Group” to your Flutter App and to your Widget-Extensions. It is very important that the group name (group.com.somename) is the same in both Targets.
The stored values in our “App Group” can now be read and written from our app and also from our widget ✅
With the help of flutter_widgetkit we can access our newly created app group with Flutter and we also have the possibility to trigger a timeline reload.
Our Showcase Flutter App
The plan is to create a widget that will increase the user experience of our app. Simple principle: the widget asks the user to open the app and to enter a simple text. After pressing a button the view of the widget changes and the text is displayed.
Now the time has come to install the previously mentioned library — flutter_widgetkit. Add flutter_widgetkit to your pubspec.yaml and run flutter pub get
Open your main.dart and import the library. We also introduced the class FlutterWidgetData which defines the data that is sent to our widget.
In our build method we declare a TextField where the user can type in a message which is later shown on our widget and a Button which sets the widgetData and triggers a reload of all timelines. That’s it for the App part ✅
Our Showcase Widget
Now we go back to our widget and finish the implementation of it.
First we declare our data structure. Of course this is the same as the one we declared in the Flutter app. A simple struct with text of type String.
Our getTimeline method became a bit bigger. We initialize a new UserDefault object with our group name and read the value of key widgetData. Then we decode this JSON and store it into the variable flutterData. After that we create a single Timeline Entry with the data we have collected before.
Our SwiftUI View turns out to be quite simple. If the user has not entered a text in the app yet, entry.flutterData will be nil and the widget shows No Data found! Got to the Flutter App else it will show the text.


Conclusion
We have reached the end of our journey. I hope I could show you that it is very easy to create a widget for your Flutter App. If there are any problems or feature requests, flutter_widgetkit is the place asks questions. All source code shown in this blog is in this respository (subfolder example).
In addition to the flutter library, I have developed react-native-widgetkit which offers the same functionality just with React Native. If you liked this blog, let me know with a Clap 👏

